Reading Time: 7 minutes
In this tutorial we’ll go through setting up a GitHub webhook using the Serverless framework.

What is Serverless? It’s a toolkit that helps you deploy and operate serverless architectures to various cloud platforms like AWS, Azure or Google Cloud Platform.
Pre-requisites
- Node.js
v6.5.0or later. - aws-cli. You can run
pip install awsclito install it (requires Python 2.6.5 or higher) - Serverless CLI
v1.9.0or later. You can runnpm install -g serverlessto install it. - An AWS account. If you don’t already have one, you can sign up for a free trial.
- A GitHub account.
Set-up your AWS provider credentials
There are quite a few ways to configure your AWS provider credentials, but for the sake of this tutorial we’ll set it up with aws-cli. Run the following command:
$ aws configure
And it will prompt you to enter your AWS credentials:
AWS Access Key ID [None]:
AWS Secret Access Key [None]:
Default region name [None]: eu-west-1
Default output format [None]: ENTER
Once this is completed, your access credentials will be stored in INI format in ~/.aws/credentials. You can edit the file directly if needed, or re-run the aws-configurecommand to update your credentials.
Now let’s go ahead and validate if your access credentials are actually working:
$ aws sts get-caller-identity
If it succeeds, you will get output in the following format:
{
“Account”: “123456789012”,
“UserId”: “AR#####:#####”,
“Arn”: “arn:aws:iam::6##5####1###2:user/xxx”
}
Create a new service
Next up we’ll create a new service. AWS provides us with a bunch of templates we can choose from, such as C#, Groovy, Python and so on. We’ll go with NodeJS.
$ serverless create –template aws-nodejs –path github-webhook
$ cd github-webhook
Deploy your service to AWS
With the following command we’ll deploy our entire service to AWS. You can run this whenever you’ve made a change to your function or configuration:
$ serverless deploy -v
Once this command has completed successfully, we can use the following command to update the code of our function. This will be a lot faster, and allows for faster development:
# serverless deploy function -f hello
Invoke your function in the cloud
Now that we have successfully deployed our function to AWS, we can actually invoke it:
$ serverless invoke -f hello -l
If you’d like to inspect what it’s doing, you can execute the following command in a different terminal, and it will stream the logs (from CloudWatch) right to your terminal:
$ serverless logs -f hello -t
Cleanup
Before we continue with writing our actual function that will be called when a GitHub webhook is triggered, we’ll clean up our “hello” function.
$ serverless remove
Set up a GitHub token
In order for our function to be able to access GitHub, we’ll need to set up a personal access token. Here’s how you set this up:
- Navigate to github.com
- In the upper-right corner of any page, click your profile photo, then click Settings.
- In the left sidebar, click Developer settings.
- In the left sidebar, click Personal access tokens.
- Click Generate new token.
- Give your token a descriptive name, eg: “serverless github webhook”
- Select the scope of permissions you’d like to grant this token. For this demo you’ll need at least “Full control of private repositories”
- Click Generate token
- Click to copy the token to your clipboard, and make a note of it. For security reasons, after you navigate off the page, you will not be able to see the token again, but we’ll need it later on in this tutorial.
Function definition
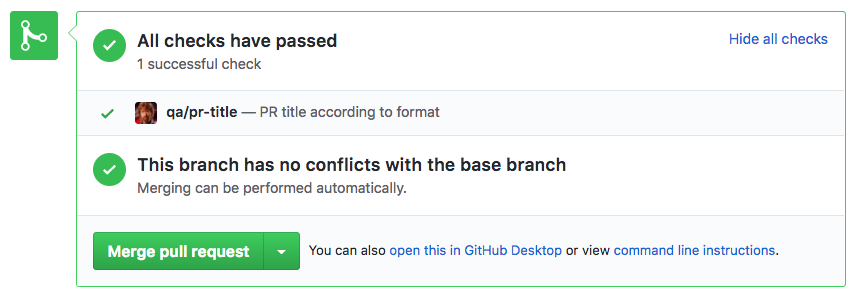
Okay, so what will our webhook do? We want to make sure that whenever someone files a GitHub pull request, the title of the pull request is formatted properly. Properly formatted in our example means that it must start with a Jira like ticket number, followed by a ticket description. For example AWS-123: Some description goes here.
We’d like to provide whether or not the pull request title is valid in the actual pull request. For this we can use GitHub status checks. Eventually the output should look as follows:
Write our function implementation
Open up the “github-webhook” project we’ve created earlier in your favourite IDE, and open the file handler.js. This file contains the “hello” function we had played with earlier:
Snippet 1
Now for our actual implementation. Before we start writing code we’re going to install the octonode npm package, as this will make our GitHub integration easier. You can run npm install --save octonode to install it.
Here’s what the actual implementation looks like:
Make sure that you replace YOUR GITHUB TOKEN with the token we’ve generated earlier.
Connect your function to a public facing API
Now that our function is done, all that’s left is to connect our function to a public facing API. This will allow allow us to configure that public API endpoint as the GitHub webhook URI.
Open the file serverless.yml, and scroll to the following section:
functions:
hello:
handler: handler.hello
And modify it as such:
functions:
webhook:
handler: handler.webhook
events:
– http: POST webhook
Here we have defined a function “webhook” and attached an endpoint “/webhook” to it, which accepts an HTTP POST.
Deploy, configure and test
We can now deploy our service to AWS by running the following command serverless deploy -v. At the bottom of the output it will show the public API endpoint, and it will look like this:
https://ld###28wb.execute-api.us-east-1.amazonaws.com/dev/webhook
Copy this value, and configure this endpoint to be called as a GitHub webhook:
- Navigate to a project that you administer at github.com
- Click on the tab Settings.
- In the left sidebar, click Webhooks
- In the left sidebar, click Personal access tokens.
- Click Add webhook
- For the “Payload URL”, enter the public API endpoint URI from earlier
- For “Content Type”, select “application/json” (remember we wrote our function to parse the body as JSON)
- Click “Let me select individual events.”
- Check the option “Pull requests”, and disable other events that might have been selected by default.
- Click “Add webhook”
- Done!
You can now test if it works by filing a pull request. Remember that you can view the logs using the command serverless logs -f webhook -t. By adding some console.log() calls to your function you can add more verbose logging.

